
LightWave Modeler LScript
Tested in: LightWave 9.6.1, 11.03 (probably works in v 8.x+ )
download Symmetry Stuff v1.02 for all platforms Win 32bit, 64bit, & Mac
build date: 15-Jan-2013 (see ChangeLog in README file in the zip for more info)
terms & conditions of download & use
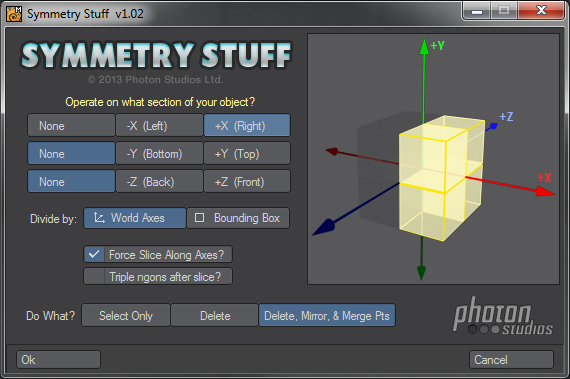
There are a few “make symmetrical” LScripts out there, unfortunately none of them are that comprehensive or easy to use. Symmetry Stuff changes all that. This script lets you choose a section of your object to operate on – be it the right-half (+X axis), the left half (the -X axis) or any other axis or combination of axes. This means not only can you select a half, of an object to work on, but you can also select a quarter of the object (in any combination of axes, whether +X+Y, +X-Y, -X-Z, etc.), and also you can select an eighth of your object (such as +X+Y+Z, +X-Y+Z, etc.). Then you can Select, Delete, or Delete, Mirror, and Merge Points of the section you’ve selected in the interface.
how to use it:
- Choose a SINGLE layer to run the plugin on
- Using the top X, Y, & Z option buttons, select which section of your object you would like to operate on — remembering that if you want to KEEP the left half, then you should be selecting the right half here for deletion etc.
- Using the “Divide by” option buttons, Select whether you want to determine the half, quarter, or eighth of your object based on the origin and world-axes, or whether you want to do it based on the object’s bounding box. Many people who model around the orgin, will typically select “World Axes”, but “Bounding Box” is very useful if you want to have the script measure your object and choose it’s center point to define where to split up the object when operating on it. If your object is off center, the Bounding Box option may be useful.
- The “Force Slice Along Axes” checkbox is used in the event you don’t actually have a polygonal edge along the axes you want to divide on. If you don’t have an edge along the axes you are dividing on, then the selections used by the script to select the half, quarter, or eighth, may not get all the polygons you intend in its grasp before operating. In some cases this could be useful – especially if there is geometry on one side of an axis which crosses over to the other side within a polygon – in this case, polygons which do not fully get enclosed by the section’s volume that you specify, will not get operated on. Forcing a slice uses the Knife tool to automatically slice along any axes you specify by choosing a section to operate on. Depending on your geometry, forcing a slice could create n-gons (polygons with greater than 4 sides). Using Force Slice when Divide by Bounding Box is selected, means your slice will be at the halfway point of the axis you’ve selected – not at the origin’s world axes. This enabled you to easily chop up other objects that are off center. The slice in this case is determined by dividing the Bounding Box of the object in half and using that as the axis (parallel to the world axes direction you have selected).
- The “Triple ngons after slice?” checkbox allows you to triple (i.e. create triangles out of) any ngons that are created as a result of the slice. In addition, any other ngons that happen to be in your foreground layer before running this script will also get tripled when this checkbox is selected. This item is not available when you have not opted to “Force Slice Along Axes”.
- Finally, choose what operation you’d like to do to the selected section you’ve specified above. You can merely Select that section you’ve specified, you can Delete it, or you can Delete it, Mirror the remaining side across the axis of that half, and after the mirror, all points will be merged to avoid duplicate points in the same space across the axis. Again, any individual points or duplicated points that were in the foreground layer before running this script will also be deleted and merged when this option is set.
- When you are happy with your settings (the graphic at the side depicts the section you intend to work on), Click OK to perform that operation or click Cancel to abort and forget about it.
notes:
- This script remembers its basic settings between runs of it.
- BACKUP YOUR OBJECTS BEFORE USING THIS SCRIPT!! – This script is tested , HOWEVER, it is better to be safe than sorry in case an unlikely bug happens or you accidentally do something that you didn’t intend to.
- The script works pretty well and is mostly bulletproof, but I haven’t *exhaustively* tested it for all wacky permutations of geometry fed to it.
- This is designed to work with one layer only – let us know on the contact page if you want this to support multiple layers fed into it.
- There is a chance that this script might mess up your Undo history – but most of the time you will be able to successfully Undo anything this script does. However, keeping a backup object prevents any problems.
- This ZIP file contains:
– ps_SymmetryStuff_v1_02.lsc – the Modeler Lscript you run
– ps_SymmetryStuff_v1_02.README – these text instructions and terms & conditions.
Leave a Reply